How to get there
Choose the Speedy Entry tool  . The Speedy menu appears.
What it does
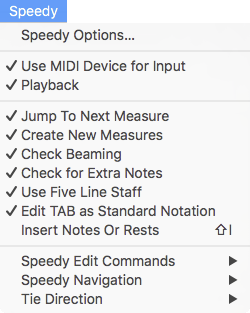
This menu contains settings that govern the music-entry operation of the Speedy Entry tool.
- Speedy Options. Choose this command to display the Speedy Options dialog box, where you can control the size of the frame around a measure while entering and editing music with Speedy Entry. You can also determine how Finale accepts MIDI signals from your synthesizer to change durations, navigate the score, and other commands.
- Use MIDI Device for Input. Choose this command to enter notes with a MIDI keyboard. When you press one of the number (rhythmic value) keys on the numeric keypad, Finale creates a rest of that value. If you press a key on the synthesizer at the same time a numeric key is pressed, Finale displays a note of that pitch (or a chord, if you were pressing more than one key). See To enter music in step time using MIDI.
When Use MIDI Keyboard isn't selected, Finale enters a note of the specified rhythmic value when you press a number key - regardless of whether or not you were pressing a key on the synthesizer (if any). To create a rest, enter a single note of the desired rhythmic value and press
- Playback. Choose this command to heat a pitched played through your MIDI device when a note is moved up and down with Speedy Entry. With this selected, a note also sounds when you enter it without MIDI. Deselect this item to turn off playback of pitches.
This command is linked to the Playback
 .
. - Jump
If this item isn't selected, Finale doesn't move the editing frame to the next measure when the current one is full; you must press the right bracket (]) key to advance to the next measure. Finale waits until you exit the current measure before it displays the
- Create New Measure. Choose this command to create a new blank measure at the end of the piece when you advance the editing frame beyond the last existing measure. If you're in the last measure of a piece and press the right bracket (]) key (or if Jump
- Check Beaming. Choose this command to beam eighth notes (and smaller notes) together, according to the time signature, as they are created. If this item isn’t selected, Finale doesn’t beam any notes together. See Time signatures for a full discussion of how the time signature affects beaming.
- Check for Extra Notes. Choose this command to have Finale check for extra notes when you leave the measure. If you try to add too many notes to a measure or extend the duration of an existing note beyond the maximum number of beats per measure, Finale displays the
When Check for Extra Notes is not selected, you can enter as many notes as you'd like in a measure and Finale does not display the
- Use Five Line Staff. Choose this command to display the standard five-line staff in the editing frame even if the staff uses a different number of lines.
If this item isn't selected, Finale displays the number of lines defined for the staff. For example, if you had a single line tablature or percussion staff, Finale would show only one staff line in the editing frame.
- Edit TAB
If this item isn't checked, Finale displays the fret numbers in the editing frame.
- Insert Notes Or Rests. Choose this command to insert the note or rest to the left of the cursor. If Use MIDI Device for Input is selected and you are holding down a key on your MIDI keyboard, a note is inserted. Otherwise, you will enter a rest.
If Use MIDI Device for Input is not selected, press
- Speedy Edit Commands. Use this submenu to edit the selected entry. See Speedy Edit Commands submenu.
- Speedy Navigation. Use this submenu to move between notes and rests in your score. See Speedy Navigation submenu.
- Tie Direction. Use this submenu to set the direction of the tie for the currently selected note. See Tie Direction submenu.
Noteman says: Remember to turn off this mode, by selecting the item again, when you’re finished inserting notes or rests.
See also: