How to get there
- Choose Plug-ins > Note, Beam, and Rest Editing > Patterson Plug-Ins Lite > Patterson Beams. The Patterson Beams plug-in appears.
- Check Additional Beam Separation For 3-Beam Groups.
What it does
Noteman says: If you find that your selected measurement unit is too large or small to work with, you can override your global choice by including the units or abbreviation when entering values. Or, you can set the default measurement units used in this dialog box by choosing
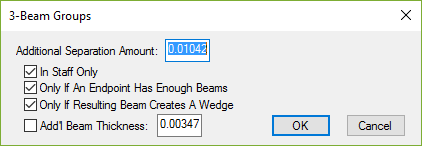
The 3-Beam Groups dialog box allows you to adjust the distance between beams when there are three beams present. You can specify when space should be added depending on how the beam is drawn in relation to staff placement, the number of beams at the end, or the creation of wedges. See Patterson Beams plug-in.
- Additional Separation Amount. Enter a value to add to the Beam Separation amount.
- In Staff Only • Only If An Endpoint Has Enough Beams • Only If Resulting Beam Creates A Wedge. Check each option that you want to have 3-Beam Groups edited. In Staff Only requires the beam group to be inside or touch a staff line. Only If An Endpoint Has Enough Beams requires that the beam group start or end with three beams. Only If Resulting Beam Creates A Wedge requires the beam group to form a white triangular space between any beam and a staff line.
- Add’l Beam Thickness. Check this option to add the specified amount to the beam thickness. Enter a value to be added to the Beam Thickness in Document Options - Beams dialog box. Normally, this value is less than or equal to the Additional Separation Amount.
- OK
See also: