How to get there
-
 .
. - If you’re in Page View, double-click the location on the page to which you want to attach the floating measure. If you’re in Scroll View, click the measure to which you want it attached (or click again if there’s already a floating measure attached to it). Or, to edit an existing floating measure, double-click its
 handleA small square which appears on currently "selectable" elements in the score. Handles allow you to select, edit and adjust musical elements in the score.. The Ossia Measure Designer dialog box appears.
 - Next to Bracket Group, click Select.
What it does
Noteman says: If you find that your selected measurement unit is too large or small to work with, you can override your global choice by including the units or abbreviation when entering values. Or, you can set the default measurement units used in this dialog box by choosing
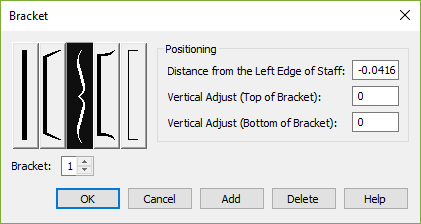
This dialog box lets you specify the bracket style and positioning for an ossia measure.
- [Brackets]. Click an image to select a bracket style.
- Distance from Left Edge of Staff. This number is how far from the left edge of the grouped staves (or from the floating measure) to place the bracket. A negative number moves the bracket to the left. Finale proposes a value that places the bracket just to the left of the staves.
- Vertical Adjust (Top of Bracket) • Vertical Adjust (Bottom of Bracket). These numbers are how far to extend the upper and lower ends of the bracket, in relation to the top of the staff and bottom of the staff, respectively. The default values, zero, place the bracket’s ends even with the top and bottom lines of the staff; a positive number for either parameter extends the corresponding end of the bracket upward. Keep in mind that you can always drag the bracket’s ends manually once it’s in the score.
- Bracket [#]. Any ossia staff can have up to 16 brackets attached; Finale numbers them sequentially. This indicator tells you which bracket is being edited. You can either type a new number into the text box, or click the UP or DOWN ARROW on the arrow controls to increase or decrease the number.
- OK
- Add. Click this button to add another bracket to the ossia staff.
- Delete. Click this button to remove the current bracket from the ossia staff.
See also: